How to Effectively Light a Scene: Simplifying Lighting for Video Production
When it comes to lighting and video production, many people tend to overcomplicate the process or ignore it entirely. After all, why not just use the light from a nearby window, right? Unfortunately, this leads to unprofessional video footage that is hard to modify in post-production. So in this blog post, we will dive into how we light our shoots, providing valuable insights and tips along the way. Whether you're a beginner or looking to enhance your skills, we've got you covered.
But before we begin, we have a special gift for you: a guide on creating highly engaging training videos in nine simple steps. You can download the checklist by clicking on the link.
How to Light a Scene For a Video Shoot
#1. Assess Available Light Sources
The first step in effectively lighting a scene for your video production project is to evaluate the existing light sources at your location. Take a look around and identify any overhead lights or natural light sources, such as windows. Consider whether these light sources are suitable for your shoot and if they require any adjustments or modifications.

#2. Invest in Lights
If you don't have access to adequate lighting, we recommend purchasing two to four lights. In our studio, we use four lights to achieve a three-point lighting setup. This setup consists of a key light, a fill light, and a backlight. If your location already has usable lights, you can incorporate them as part of the three-point lighting system and supplement them with additional lights as needed.
Recommended Lights:
We highly recommend the Neewer Dimmable bi-color lights, which we use in our studio. These lights are cost-effective and can be purchased for less than $200 for a set of two.
Related Read: What Kind of Equipment Do I Need for Training Videos?

Image credit: cinemagics.com
#3. Understanding the Three-Point Lighting System
The three-point lighting system is a fundamental technique taught in film schools. It ensures proper illumination, minimizes shadows, and adds depth to your shots. Here's a breakdown of the three key lights:
- Key Light: This is the primary light that illuminates your subject or subjects. It provides the main source of light and sets the overall tone of the scene.
- Fill Light: The fill light helps eliminate harsh shadows created by the key light. It softens the lighting and ensures a balanced distribution of light across the subject's face.
- Backlight: Positioned behind the subject, the backlight adds separation between the subject and the background. It creates depth and prevents the subject from blending into the background.
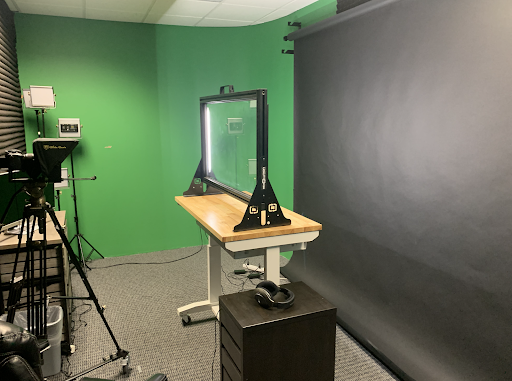
#4. Utilizing a Lightboard
For our own setup, we use a lightboard, which offers built-in lighting capabilities. The lightboard consists of four strips of light that act as a key and fill lights. This technology simplifies the lighting process, eliminating the need for additional lights. If you're interested in purchasing a lightboard, we recommend Revolution LightBoards.
Related Read: Revolution Lightboard: The Good, the Bad, and the Ugly
#5. Considering Natural Light
While natural light can be beautiful, it can also be unpredictable. If your shoot takes place in an environment with natural light or near windows, be mindful of the sun's position and the potential impact on your lighting. Changes in the weather, cloud cover, and the sun's movement can create varying lighting conditions. Plan accordingly and be prepared to make adjustments during your shoot.
Conclusion
By simplifying the lighting process and following the principles of the three-point lighting system, you can enhance the quality of your video productions. Remember to assess available light sources, invest in appropriate lights if necessary, and consider the impact of natural light. With these tips and techniques, you'll be well on your way to creating professional-looking videos without the need for a video production company.
Find Where You’re Losing $100K+ in Your Business
Join the 3-day challenge to uncover hidden profit leaks and leave with a clear plan to fix what’s not working.
+ receive exclusive content direct to your inbox every week.